After a visitor submits a form, show a thank-you page that confirms what you received, tells them what happens next, and gives them one useful action while they wait. This is also the point to count a lead in GA4 and Google Ads, once your form system has accepted the submission.
Think of the last time you sent a quote request and saw only “Thanks!” Did it go through? Should you wait for a call, check your inbox, or send photos? The examples below show how to answer those questions with a few lines of copy. They’re fictional and use response times only to illustrate what your own team might promise.
Example 1 for a quote request
We received your roof repair request
We’ll call within one business day to ask about the leak and discuss a time to take a look. If it’s safe to do so, take a photo of the affected area so you can share it when we reach out.
Button: See what to expect at an inspection
This gives the homeowner something useful to do while they wait. Use a callback window your team can consistently meet.
Example 2 for an appointment request
We received your appointment request
Your appointment is pending. We’ll email you to confirm a time. In the meantime, you can check our location, parking, and what to bring.
Button: Plan your first visit
Use “appointment confirmed” only if your booking system has reserved the slot. If the form collects preferences, state that the time is pending.
Example 3 for a general inquiry
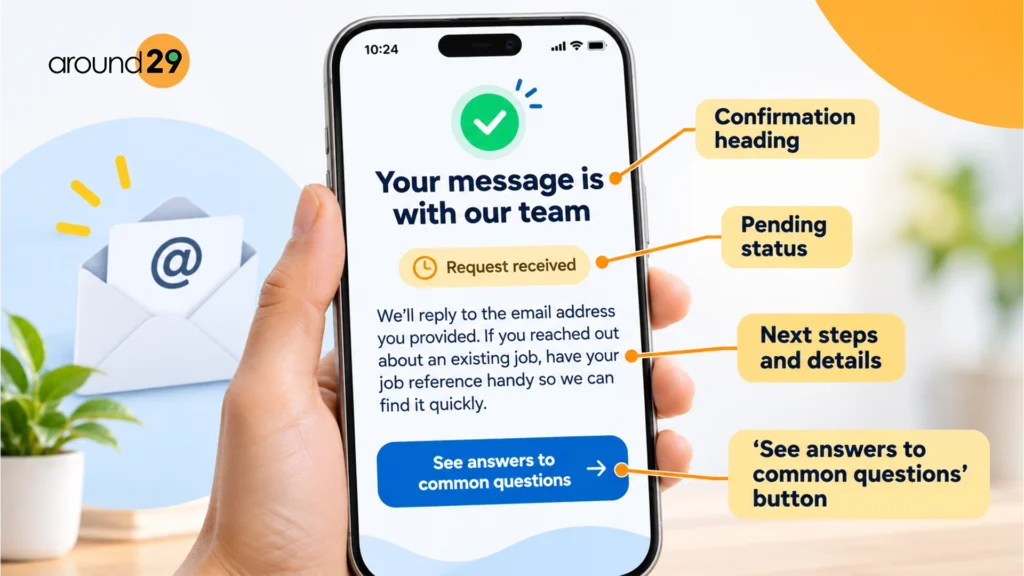
Your message is with our team
We’ll reply to the email address you provided. If you reached out about an existing job, have your job reference handy so we can find it quickly.
Button: See answers to common questions
A relevant FAQ or service guide can help while visitors wait. Leave the confirmation and the next step at the top, where they’re easy to spot on a phone.
Example 4 for a requested guide
Your moving checklist is ready
You can download a copy now and start with the section for your move date. We’ve also sent a link to the email address you entered so you can find it later.
Button: Download the moving checklist
If the visitor filled out a form to get a resource, make the download the main action. Offer it on the page if you can, so the visitor can use it even if the email is delayed. Include the line about email only if the form actually sends one.
Put the confirmation where visitors can see it
Start with the confirmation heading, follow it with a short explanation of what happens next, then show the primary button. On a phone, check that the confirmation appears before a large image or another offer. Use a button label that explains where it goes. “Plan your first visit” helps a visitor decide whether to tap it.
Adapt this simple structure to your own form. Name the type of request, explain who responds and how, and choose a next action that fits the visitor’s reason for submitting. A quote request can point to a guide that helps someone prepare. A download request should put the resource within reach.
How to count the form conversion in GA4 and Google Ads
Show the thank-you page after the form system accepts and records the inquiry. That successful submission is what both tools should measure. Tie the tracking to a confirmed submission or to a thank-you page reached through a verified, one-time submission flow. A plain page-view rule can count a bookmarked visit or a refresh as a new lead. If the form stays on the same page, use its confirmed success event to show the message and fire the tracking.
- In GA4, send the recommended generate_lead event once per accepted submission and mark it as a key event. Your form tool or developer can connect the event to the form’s success signal. See Google’s recommended GA4 events.
- In Google Ads, use a website conversion tag that fires on the same verified success, or create a conversion from the GA4 key event after linking the accounts. If both are set up, choose one primary conversion for bidding so the same inquiry doesn’t count twice in the main Conversions column. For most inquiry forms, Google Ads’ “One” setting is a sensible starting point. It counts at most one conversion per ad click for that action and does not replace the check for a real submission. See Google’s guides to creating an Ads conversion from GA4 and conversion counting options.
If several forms share a confirmation page, carry a generic identifier such as roof_quote or appointment_request from the confirmed submission so you can tell them apart. Keep names, email addresses, phone numbers, and message text out of the confirmation URL and GA4 event data. An email address in a URL can be collected automatically with the page location. See Google’s guidance on avoiding personal information in Analytics.
Test before you send traffic to the form
- Submit a valid test inquiry. Check that it appears in the inbox, form log, or CRM where your team expects it. Confirm the success message appears and generate_lead shows once in GA4 DebugView. If you use a Google Ads website tag, verify its firing in Tag Assistant.
- Try the paths that should count zero. Submit with a required field missing, load the thank-you URL directly in a fresh session, and refresh it after a successful submission. None of these should add a lead event.
- Check Ads attribution separately. A test submission verifies that the tracking fires. Google Ads reports a conversion when it can attribute the submission to an eligible ad interaction. Use GA4 DebugView and Tag Assistant to check the setup.
After launch, compare the leads shown in Analytics with the submissions stored in your form tool for the same period. If you see a large gap, test each form separately and check whether the same success triggers fire from the form and the thank-you page. Use the form inbox or CRM to verify individual inquiries.
Still deciding where ad traffic should land before the form? Read Landing Page vs Homepage. For help building the page, the form, and the confirmation flow together, see our landing page services.